Discovering, Customizing, and Securing Your WordPress Login URL
For novice users navigating WordPress, logging into their accounts can pose a challenge. In this guide, I’ll outline how to locate your WordPress login URL and underscore other key aspects of the login process.
How to Log In to WordPress Using the Login URL, Upon WordPress installation, access is granted to your website’s admin dashboard, empowering you to configure your site to your preferences and enact changes.
However, without access to the admin pages, this would be an insurmountable task. The login page serves as the gateway, preventing unauthorized access to the management “side” of your WordPress site.
Complete control over your site/blog is unattainable without access to the admin area.
Understanding various login methods for your WordPress website is crucial. Should the conventional approach falter, alternative methods can still facilitate access to your website.
This guide delineates three methods for logging into WordPress: via the login URL, hPanel, and password recovery.
Default WordPress Admin URL Explained
To access your WordPress Admin area by default, you have several options for the URL structure:
- domain.tld/admin
- domain.tld/wp-admin
- domain.tld/login
- domain.tld/wp-login
Here, “domain.tld” represents your specific domain name.
If you’ve installed WordPress on a subdomain, you still have two viable options:
- subdomain.domain.tld/wp-admin
- domain.tld/subdomain/wp-admin
What to Do if the Default WordPress URL Doesn’t Work
Firstly, ensure that your WordPress installation is functioning correctly. Tools like Whatsmycms can assist in verifying this.
Subsequently, check for any plugins that might be altering the wp-admin URL. If such a plugin exists, manually disabling it should reinstate the default URLs.
Navigating WordPress Login: Accessing Your Admin Panel
To log in to WordPress using the login URL, simply append “/wp-admin” to your site’s URL. For instance, if your website is www.example.com, type www.example.com/wp-admin in your browser’s address bar to access the login page.
Upon reaching the correct login page, you’ll encounter the WordPress login form. Here, input your credentials – Username or Email Address and Password – and then click Log In to gain entry to your WordPress admin dashboard.
Alternative variations of the WordPress login page URL might include:
In cases where WordPress is installed on a subdomain or subdirectory, the login URL differs slightly. For instance, if your WordPress installation is on blog.example.com, the login URL would be blog.example.com/wp-admin.
Similarly, for WordPress installations in a subdirectory like www.example.com/blog, the login URL would be www.example.com/blog/wp-admin.
It’s imperative to grasp the wp-admin folder structure to effortlessly locate the link to your WordPress admin area, irrespective of your site’s configuration.
Significance of the WordPress Login Page
The WordPress login page serves as the gateway to your website’s dashboard, where all changes and updates are managed. Accessing the dashboard necessitates undergoing the WordPress login process, entailing the input of your username or email address along with your password.
By default, WordPress doesn’t conceal the login page, making it easily discoverable to any user acquainted with WordPress’s login URL structure. However, mere visitors cannot progress beyond the login page unless equipped with valid credentials.
Upon launching a new WordPress website, the CMS automatically generates an administrator account for you. The “administrator” user role possesses full permissions, granting unrestricted access to every tool and setting within the dashboard. Consequently, compromising your admin account credentials entails granting complete access to your site.
WordPress allows the establishment of various account types for additional users, provided they maintain secure credentials. While unauthorized access can be mitigated through secure accounts, enhancing the security of your login page and website against potential attacks involves concealing the WordPress admin URL.
Modifying the Default WordPress Login URL
In this guide, we’ll illustrate how to alter the WordPress admin login URL through two methods: manual adjustment and plugin integration. We’ll commence with the plugin method, generally regarded as the preferable option for most users.
Changing the Default WordPress Login URL with a Plugin
To simplify the process of altering the WordPress login URL, employing a plugin is the most straightforward method. While numerous tools are available for this task, we’ll focus on utilizing WPS Hide Login for this tutorial.
This plugin facilitates the concealment of both the WordPress login and the /wp-admin URL by modifying the WordPress login URL and redirecting any attempts to access the login and admin pages through their default addresses.
To initiate the change, activate the plugin and navigate to Settings → WPS Hide Login. Alternatively, you can locate the plugin settings at the bottom of the Settings → General configuration page.
Within this section, locate the field designated for entering the new WordPress login URL. Additionally, you can specify the page that should load if a user attempts to access the default admin or login addresses.
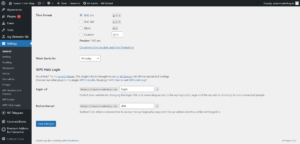
Upon making the desired adjustments, click on Save Changes to finalize the process. Following this, any attempt to access the default WordPress login address should redirect to the page you’ve just configured. Remember to save the new URL for future logins.
Enhancing Security with Login Attempts Limitation
An effective security measure to safeguard your WordPress site is to restrict the number of login attempts. At Kinsta, for instance, clients benefit from an automated system that bans IPs following more than six failed login attempts within a minute. Alternatively, you can opt for a free plugin like Limit Login Attempts Reloaded.
The plugin’s options are straightforward:
- Total Lockouts: Indicates the number of failed login attempts by potential hackers.
- Allowed Retries: Specifies the maximum number of attempts permitted from an IP address before triggering a lockout. A range between four and six retries strikes a balance, accommodating genuine user errors.
- Minutes Lockout: Determines the duration an IP address remains locked out. Opting for a 20-30 minute lockout period balances security and user convenience.
- Lockouts Increase: This feature escalates lockout durations for repeat offenders, deterring brute force attacks. A one-day increment is a prudent choice.
- Hours Until Retries: Sets the duration before the system resets and allows users to attempt login again.
Additionally, the plugin enables management of whitelists, blacklists, and trusted IPs, offering further control over site access.
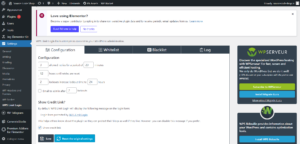
By configuring these settings judiciously, especially in scenarios involving frequent guest bloggers or multiple staff contributors, you can fortify your site against unauthorized access attempts while ensuring legitimate users can rectify login errors without undue inconvenience.
A Step-by-Step Guide to Changing the Default WordPress Login URL Manually
Altering the WordPress login URL manually is a process fraught with risks, potentially compromising vital website features. Therefore, we strongly advise using a plugin for this task, as it offers a safer and more straightforward approach. However, if you choose to proceed manually, proceed with caution.
Manual modification of the login URL entails editing a copy of the wp-login.php file. Here’s a detailed walkthrough of the process:
- Connect via FTP: Access your website’s root directory via FTP to locate the wp-login.php file.
- Download wp-login.php: Download a copy of wp-login.php to your computer.
- Edit wp-login.php: Open the local copy of wp-login.php using a text editor equipped with a “search and replace” tool. Search for every instance of “wp-login.php” and replace it with the desired new login page name.
- Save changes: After replacing all instances, save the edits to the file and close it.
- Rename the file: Rename the file to match the new URL (e.g., access.php).
- Upload the file: Upload the modified file to the WordPress root directory.
- Modify functions.php: If you’re using a child theme (recommended), locate the functions.php file within the child theme folder and open it. Insert the following WordPress hook before the line // END ENQUEUE PARENT ACTION:
add_filter( ‘login_url’, ‘custom_login_url’, PHP_INT_MAX ); function custom_login_url( $login_url ) { $login_url = site_url( ‘access.php’, ‘login’ ); return $login_url; }
- Save changes to functions.php: Save the changes to functions.php.
- Test the new login URL: Try accessing the custom login URL you’ve just set up. Ensure it functions identically to the original wp-login.php file.
- Delete original wp-login.php: Once confirmed, return to the WordPress root directory and delete the original wp-login.php file.
- Update themes: If you switch themes, remember to add the hook to the new theme’s functions.php file to maintain functionality.
Please exercise caution when manually altering core WordPress files, as any errors could disrupt your website’s operation. It’s advisable to back up your site before proceeding with such modifications.
Logging Into WordPress via hPanel: A Quick Guide for Hostinger Users
For users of Hostinger’s managed WordPress hosting, hPanel offers a streamlined method to access the WordPress login process.
This method expedites the login process by bypassing the need to input login credentials on the wp-admin page. It also serves as an effective alternative if encountering issues with the wp-admin login URL. Follow these simple steps:
- Log in to your Hostinger account to access hPanel.
- Navigate to the Websites section on the navigation bar.
- Click on “Admin Panel” next to the WordPress website you wish to manage.
Additionally, this approach facilitates the management of multiple WordPress installations from a single hosting account. It proves to be a time-saving feature for individuals overseeing numerous sites, granting swift and simultaneous access to each website’s admin dashboard.
Enhancing WordPress Security by Changing the Login Page
Protecting your WordPress login page from potential threats is paramount to safeguarding your website from malicious attacks. Even with robust passwords, additional security measures are crucial.
Moving the WordPress login page to a new, unique URL is a swift and effective strategy to deter unauthorized access attempts. By changing the login URL, you create an additional layer of defense against random attacks, hacks, and brute force attempts.
Brute force attacks pose a significant risk, involving repeated attempts to guess usernames and passwords using automated scripts. These attacks exploit lists of common credentials leaked on the web. Given the prevalence of such lists, coupled with the public knowledge of the standard WordPress login URL, hackers have an easier time gaining access to your site.
Therefore, relocating the WordPress login page to a different path can substantially bolster your website’s security posture.
Troubleshooting an Inoperative Custom WordPress Login URL
Encountering issues with your custom WordPress login URL can be frustrating, but several common causes may explain the problem. Let’s explore some of the most prevalent ones.
Addressing Issues with a Manually Changed WordPress Login URL
Encountering problems with a manually altered WordPress login URL can disrupt access to your admin dashboard. Here’s what to do in such situations:
- Troubleshooting Steps: If your custom login URL stops working after manual changes, several factors could be at play:a. Deletion During Updates: Updating WordPress might inadvertently remove the new login page added to the root directory.b. Theme Updates: If you’re not using a child theme and update the active theme, any modifications made to its functions.php file, including recognition of the new login page, will be overridden.
- Fallback to Default Login URL: Initially, attempt to access the default WordPress login address. If successful, you’ll need to reconfigure the address manually following the instructions provided in the earlier part of this troubleshooting guide.
By reverting to the default login URL, you can regain access to the admin dashboard and proceed with necessary adjustments to resolve the issue with the custom login URL.
Addressing Issues with a Custom WordPress Login URL Configured via a Plugin
Encountering difficulties with your custom WordPress login URL, established through a plugin, can disrupt access to your admin dashboard. Here’s what to do in such scenarios:
- Plugin Deactivation: If you configured a custom login URL using a plugin, the new address should remain functional unless you deactivate the plugin. For instance, plugins like WPS Hide Login revert your login address to its original URL upon deactivation. In this case, accessing the dashboard using the default login link should resolve the issue.
- Compatibility Issues: If the plugin is active but the custom login URL isn’t working, a compatibility issue with WordPress or another plugin might be at play. Temporarily disabling the plugin can restore access to the admin dashboard and allow you to continue site updates.
- Disabling the Plugin via FTP: If you can’t access the admin dashboard to deactivate the plugin, FTP provides an alternative method. Connect to your website via FTP and navigate to wp-content/plugins. Locate the folder corresponding to the plugin responsible for the login URL change (usually named similarly to the plugin). You can either rename or delete this folder.
- Renaming the folder temporarily disables the plugin.
- Deleting the folder uninstalls the plugin.
Disabling the plugin through either action should resolve the compatibility issue. Your WordPress login page will revert to the original URL, enabling access to the admin dashboard.
FAQ’S for How to Log In to WordPress Using the Login URL
How can I make my WordPress login page more secure?
Answer: To enhance WordPress login security, consider changing the default login URL, implementing two-factor authentication (2FA), enabling the Remember Me option cautiously, restricting login attempts, and regularly updating passwords.
How do I change the WordPress login URL?
Answer: You can change the WordPress login URL by using plugins like WPS Hide Login, which allows you to alter the default login URL easily. This practice increases security by making it harder for unauthorized users to locate the login page.
What is two-factor authentication (2FA), and how can I enable it for WordPress?
Answer: Two-factor authentication (2FA) adds an extra layer of security to your WordPress login process by requiring users to verify their identity through a second factor, such as a code sent to their mobile device. You can enable 2FA using security plugins like Wordfence.
Why should I enable the Remember Me option on the WordPress login page?
Answer: Enabling the Remember Me option on the login page allows for longer sessions and reduces the need for frequent logins. However, it's crucial to ensure that the device you're using isn't accessible to other users to prevent unauthorized access.
How can I limit login attempts on my WordPress site?
Answer: You can restrict login attempts on your WordPress site by utilizing security plugins that block access after multiple failed login attempts. This measure is essential for thwarting brute-force attacks and unauthorized entry attempts.



2 thoughts on “Best Method for How to Log In to WordPress Using the Login URL 2024”